Notes on ADA Compliance:
2025 CCSS Experience and What I Learned:
- Always try out Acrobat’s autotag option to see how it does! Acrobat > All Tools > View More > Prepare for Accessibility. It’s worth a shot, although it wasn’t helpfu in 2025.
- Window > Articles: Establish Reading Order by dragging only items that you want to have read
- Right-click > Object Export Options: Add alt text to all images. You can keep this panel up and apply alt text quickly this way.
- Utilities > Tags: Import tags from previous document.
- Hand tag items from the pages (and remember that tags have nothing to do with reading order). Select items on pages and then apply the tag. You can use control to select multiple items at a time. Table of Contents tags have never worked for me!
- TOC: I ended up breaking the text from any paragraph style, and when I did that, I no longer had any errors in Acrobat! To do this, select text box and right-click and select break style.
- Make sure that you update the document title and add the identifier file. File > File Info > Bottom of popup click on Template > Import > the file lives in Cornell-CCSS-DeptofNaturalResources 2023 AR folder..it is an .xmp file
- Export document to Acrobat. Try to get as few errors in Acrobat as possible.
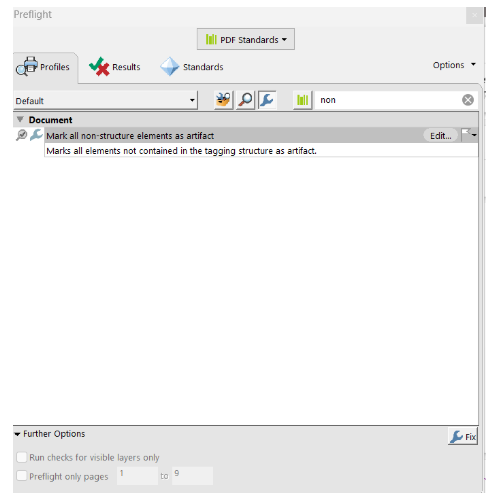
- In Acrobat > Apply PDF Standards > Preflight > Wrench > Mark all non-structure elements as artifact
- Preflight > Wrench > Create content entry for link annotations (this resolved issues with TOC and links)
- Run PAC Test (only available on PC) to determine errors.
- Hopefully this will save you some time! 🙂
Easier to hand tag after designing.
- Add Document Title
- Add PDF identifier: File > File Info > Bottom of popup click on Template > Import > the file lives in Cornell-CCSS-DeptofNaturalResources 2023 AR folder..it is an .xmp file
- Add tags to styles (map paragraph styles to export tags)
- Establish reading order: Articles Panel (Window > Articles) determines order… ONLY pull things in there that you want to tag. Leave everything else out!
- Create an article and drag and drop only the contents that you want.
- Table of Contents: Layout > Table of Contents
- Artifacts and Alt Text: right-click > Object Export Options: If tags don’t seem to stick, make sure you double click on image to select and add alt text!
- Thread content for separated articles by linking boxes
- Create articles and then drag content into articles panel
- You can create an Object Style that will tag images as artifacts. Very helpful and time-saving
- Headings must flow in order… careful auto-tagging headings. Definitely autotag H1, and you can have multiple H2-A, H2B etc. May need to tag these by hand if not in logical order
- You can also map tags to styles: ex when captions not working correctlt, open tags and map it to the caption style
- Reading order (also called Tab Order) is determined by layer order… first item goes on BOTTOM which is not logical! 😉
- Export as Interactive PDF, make sure to “use structure for tab order”
- Make sure settings in styles and articles are marked to export to PDF (otherwise the PDF will ignore them!)
- Certify the PDF: https://taggedpdf.com/508-pdf-help-center/pdfua-identifier-missing/
- You may want to break link to styles… it can create problems
In Acrobat > Apply PDF Standards > Preflight > Wrench > Mark all non-structure elements as artifact
This was SOOOO helpful: Apply PDF Standards > PDF Standards > Click on Wrench > Profiles Mark all non-structure elements as artifact
Linked In Learning Tutorials: Creating Accessible PDFs
Adobe Article on ADA Compliant Documents in Indesign
How to make lines into artifacts in Acrobat: https://www.youtube.com/watch?v=DAeS6BxWlwI
2022 Edit: A really good practice, even after the design is completed with individual text box frames, it to link them all at the end. You may need to hit return after headings, etc. when you are linking so that the heading styles don’t carry into the next box.
Fixing Tab Order:
It’s easy to set it in Acrobat:
- Open the Thumbnails/Pages panel in Acrobat.
- Select all of the pages in the document. Control/Command + a will select them all in the panel.
- Right-click on one of the pages and select Properties.
- Select Use Document Structure under the Tab Order tab.
- Save the PDF and rerun the checker. The error should now be gone.
Overview of Steps:
- Paragraph Styles > Edit > Export Tagging
- Window > Utilities > Tags
- From Above , Click on Menu for Options and Map the Tags to Styles
- Artciles Panel: Windows > Articles
Intall XML Compliance file into InDesign!!!!
Also, another route to think about: if you are building the source file for the PDF in InDesign, you can (instead) embed the pdfAU-ID.xmp metadata inside the InDesign file…..and the metadata will exist in the exported PDF without any other efforts.
To do so, from the InDesign file, click FILE in the top menu bar, click in “File Info” in the drop-down menu, in the new window that appears, click “Template” at the bottom and choose “Import” from that drop-down menu. Route yourself to the pdfUA-ID.xmp file, choose it and click “Open.” A pop-up window will open with three radio buttons from you to choose from. Choose “Keep original metadata, but append matching properties from template” and click “OK.”


Now this metadata is inside your InDesign source file and no matter how many times you have to make a change in InDesign and re-export to PDF, the metadata is embedded and will be inside your exported PDF.
If Above Doesn’t Work, add XML in Acrobat:
https://taggedpdf.com/508-pdf-help-center/pdfua-identifier-missing/